 サトリク
サトリク
この講座では、簡単にToDoリストアプリのコーディングをしていきます。
まずは、ToDoを追加して表示できるようにしましょう。
動作環境
| item | Version |
|---|---|
| Swift | 5.2.4 |
| Xcode | 11.5 |
アプリ開発手順
リストを作成
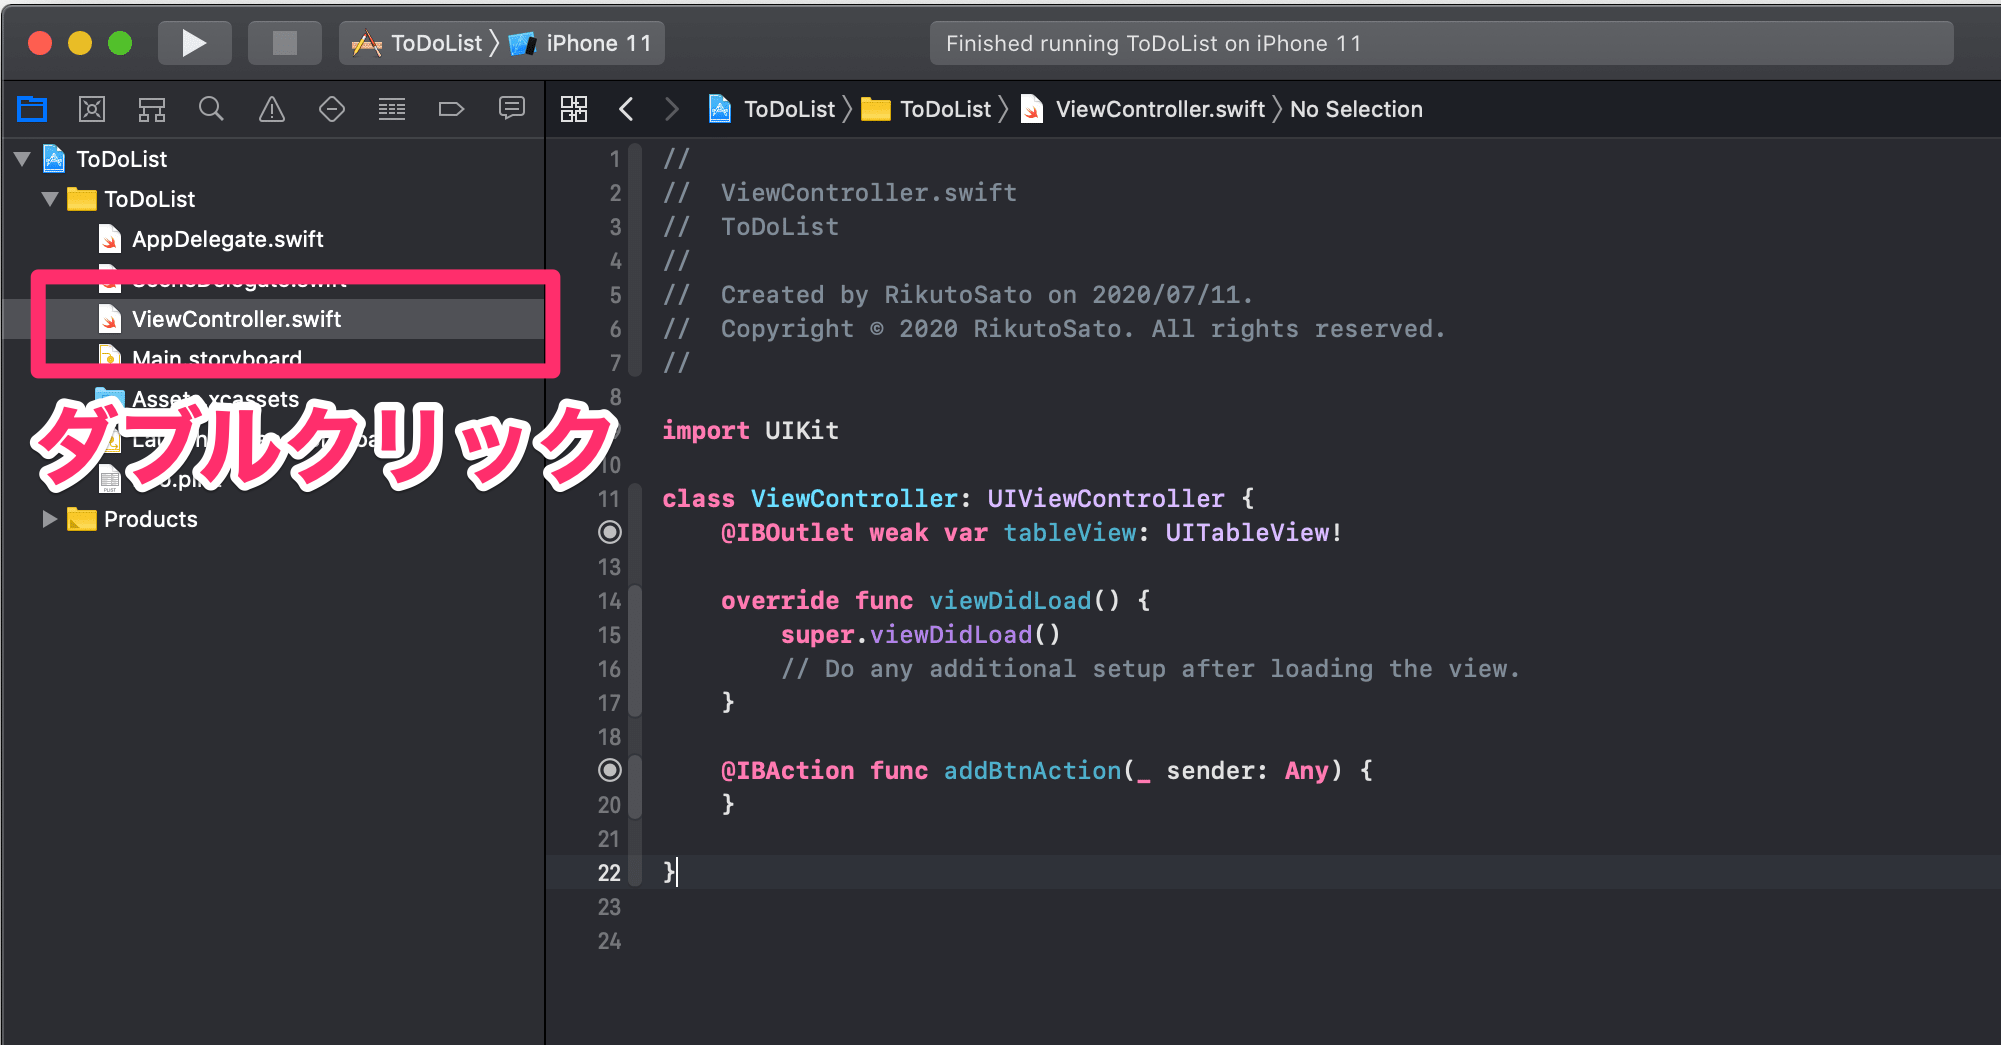
まずは、画面と紐づいているクラス、ViewControllerを開きます。
現状、実行するとエラーがおきます。
なぜなら、テーブルのセルの中身と数が決まってないからです。
まずは、テーブルのセルの中身と数を決めるコーディングをしていきます。
import UIKit

//①変更:プロトコル(UITableViewDataSource, UITableViewDelegate)の追加
class ViewController: UIViewController, UITableViewDelegate, UITableViewDataSource {

    @IBOutlet weak var tableView: UITableView!

    // ②追加:テーブルに表示するデータの箱
    var todoList = [String]()

    override func viewDidLoad() {
        super.viewDidLoad()
        // Do any additional setup after loading the view.
    }

    @IBAction func addBtnAction(_ sender: Any) {
    }

    // ③追加:セルの数を指定
    func tableView(_ tableView: UITableView, numberOfRowsInSection section: Int) -> Int {
        return todoList.count
    }

    // ④追加:セルの中身を設定
    func tableView(_ tableView: UITableView, cellForRowAt indexPath: IndexPath) -> UITableViewCell {
        let cell = tableView.dequeueReusableCell(withIdentifier: "todoCell", for: indexPath)
        let todoTitle = todoList[indexPath.row]
        cell.textLabel?.text = todoTitle
        return cell
    }

}
上記のように、ViewControllerを変更してください。
テーブルを使うときは、このコードを書かないと始まりません。
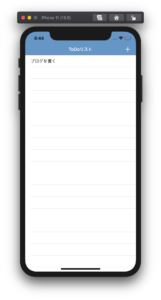
実行してみましょう。
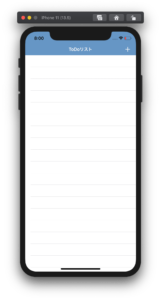
このように、リストが表示されるはずです。
テキストフィールド付きアラート追加
次は、プラスボタンを押したときに、テキストフィールド付きのアラートを出します。
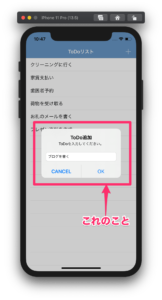
これのことです。
ボタンを押した時なので、addBtnActionのメソッドの中に記述していきます。
@IBAction func addBtnAction(_ sender: Any) {
}
以下のように処理を追記しましょう。
@IBAction func addBtnAction(_ sender: Any) {
    let alertController = UIAlertController(title: "ToDo追加", message: "ToDoを入力してください。", preferredStyle: UIAlertController.Style.alert)
    alertController.addTextField(configurationHandler: nil)
    let okAction = UIAlertAction(title: "OK", style: UIAlertAction.Style.default) { (acrion: UIAlertAction) in
        //OKをタップした時の処理
    }
    alertController.addAction(okAction)
    let cancelButton = UIAlertAction(title: "CANCEL", style: UIAlertAction.Style.cancel, handler: nil)
    alertController.addAction(cancelButton)
    present(alertController, animated: true, completion: nil)
}
実行して確認してみましょう。
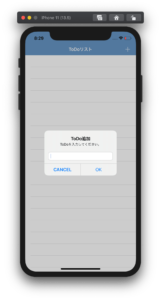
プラスボタンを押すと、テキストフィールドつきのアラートが表示されることを確認しましょう。
次は、OKを押した時、TextFieldに入力されている値をテーブルに追加する処理を書いていきましょう。
以下のように、追記しましょう。
@IBAction func addBtnAction(_ sender: Any) {
    let alertController = UIAlertController(title: "ToDo追加", message: "ToDoを入力してください。", preferredStyle: UIAlertController.Style.alert)
    alertController.addTextField(configurationHandler: nil)
    let okAction = UIAlertAction(title: "OK", style: UIAlertAction.Style.default) { (acrion: UIAlertAction) in
        // 追加:OKをタップした時の処理
        if let textField = alertController.textFields?.first {
            self.todoList.insert(textField.text!, at: 0)
            self.tableView.insertRows(at: [IndexPath(row: 0, section: 0)], with: UITableView.RowAnimation.right)
        }
    }
    alertController.addAction(okAction)
    let cancelButton = UIAlertAction(title: "CANCEL", style: UIAlertAction.Style.cancel, handler: nil)
    alertController.addAction(cancelButton)
    present(alertController, animated: true, completion: nil)
}
これで、OKをタップすると、TextFieldに書いた値がテーブルに追加されます。
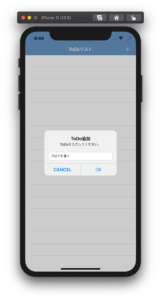
このように、TextFieldに値を入れてOKをタップしてテーブルに追加できることを確認しましょう。
これで、ToDoが追加できるようになりました。
確認
うまくいかない場合、このコードをまるっとコピペしましょう。
コピペしてもできないのであれば、前回の講座で間違えている可能性があります。
import UIKit

// プロトコル(UITableViewDataSource, UITableViewDelegate)の追加
class ViewController: UIViewController, UITableViewDelegate, UITableViewDataSource {

    @IBOutlet weak var tableView: UITableView!

    // テーブルに表示するデータの箱
    var todoList = [String]()

    override func viewDidLoad() {
        super.viewDidLoad()
        // Do any additional setup after loading the view.
    }

    @IBAction func addBtnAction(_ sender: Any) {
        let alertController = UIAlertController(title: "ToDo追加", message: "ToDoを入力してください。", preferredStyle: UIAlertController.Style.alert)
        alertController.addTextField(configurationHandler: nil)
        let okAction = UIAlertAction(title: "OK", style: UIAlertAction.Style.default) { (acrion: UIAlertAction) in
            //OKをタップした時の処理
            if let textField = alertController.textFields?.first {
                self.todoList.insert(textField.text!, at: 0)
                self.tableView.insertRows(at: [IndexPath(row: 0, section: 0)], with: UITableView.RowAnimation.right)
            }
        }
        alertController.addAction(okAction)
        let cancelButton = UIAlertAction(title: "CANCEL", style: UIAlertAction.Style.cancel, handler: nil)
        alertController.addAction(cancelButton)
        present(alertController, animated: true, completion: nil)
    }

    // セルの数を指定
    func tableView(_ tableView: UITableView, numberOfRowsInSection section: Int) -> Int {
        return todoList.count
    }

    // セルの中身を設定
    func tableView(_ tableView: UITableView, cellForRowAt indexPath: IndexPath) -> UITableViewCell {
        let cell = tableView.dequeueReusableCell(withIdentifier: "todoCell", for: indexPath)
        let todoTitle = todoList[indexPath.row]
        cell.textLabel?.text = todoTitle
        return cell
    }

}
まとめ
うまくできましたでしょうか。
わからない部分があれば、TwitterのDMか、コメントで質問して貰えばすぐ返します。(コメントはレス遅いかも)
次回の講座では、削除機能と保存機能を追加していきたいと思います。
次の講座 【Swift/Xcode超入門】ToDoリストを作ってみよう③〜削除機能と保存機能の追加〜
本で勉強したい方はこちら 【2021年版】Swift5/Xcode/OSアプリ開発のオススメ参考書・本・書籍まとめ。初心者から上級者まで!
ゼロから学ぶiPhoneアプリ開発入門